


½” – 1 ½” DryLink Seal Replacement
This video will show you how to replace the main seals within a Drylink Unit between ½” and 1 ½”.
(Keep scrolling for larger sizes)
Replacement seal kits are available from Action Sealtite, please call 01235 512500 or email sales @actionsealtite.com. (please note that the lubricant and tool is not included)
Included in a seal replacement kit you will receive a main seal, an allen key and 4 screws.
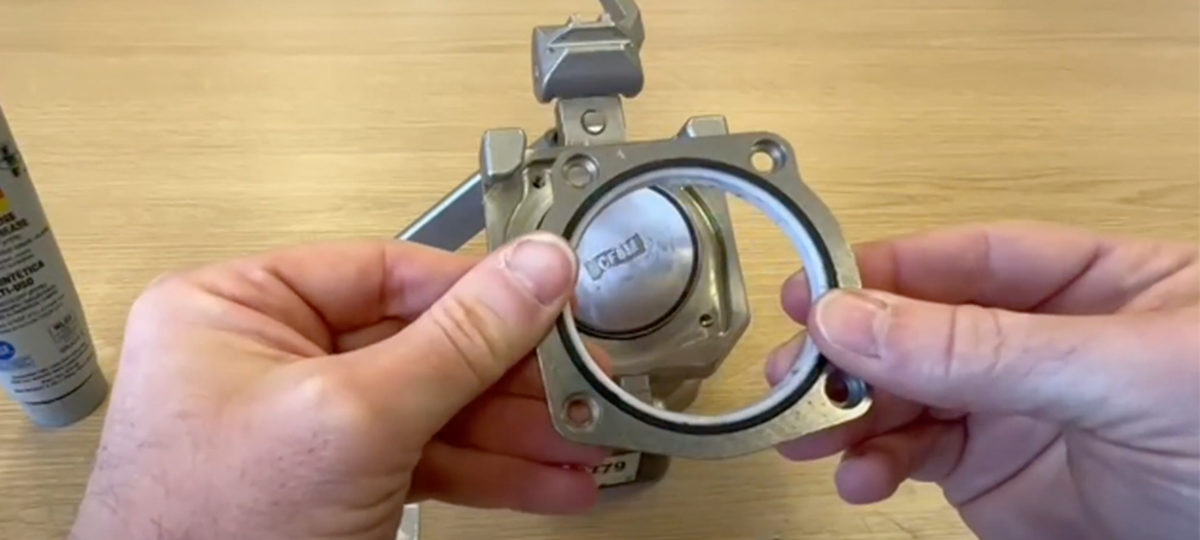
Ensure the valve is in the closed position.
Start by using the allen key to unscrew and remove the four existing seal screws, dispose of these old screws responsibly.
Pull out the old seal and dispose of responsibly.
Lubricate the plastic part of the replacement tool and place inside the new seal.
Place and line up the screw holes of the new seal on to the DryLink unit.
Place the metal cylinder of the replacement tool over the rubber part and push the seal firmly downwards on a flat, stable surface.
Use the allen key to fix the four new screws into place.
Test the fitting buy opening and closing the valve several times. If needed re-loosen the four screws and Adjust the seal and retighten and repeat the test.
We suggest the Dry Link coupling is then pressure tested to make sure there is no leak.
Please call 01235 512500 or email sales@actionsealtite.com for your replacement seal kit and for any queries you may have.
Find out more about DryLink and the benefits.
2” – 4” DryLink Seal Replacement
This video will show you how to replace the main seals within a Drylink Unit between 2” and 4”.
Replacement seal kits are available from Action Sealtite, please call 01235 512500 or email sales @actionsealtite.com. (please note that the lubricant and tool is not included)
Included in a seal replacement kit you will receive a main seal, an allen key and 4 screws.
Ensure the valve is in the closed position.
Start by using the allen key to unscrew and remove the four existing seal screws, dispose of these old screws responsibly.
Push in the push button and open the flow control handle and pull out the old seal and dispose of responsibly.
Then close the valve and check for damage and that the seal seat is clear of grit or dirt.
Lubricate the plastic part of the replacement tool and place inside the new seal and push the seal firmly downwards over the tool on a flat, stable surface.
Place and line up the screw holes of the new seal on to the DryLink unit and use the tool to push the new seal firmly downwards over the top of the valve.
Use the allen key to fix the four new screws into place.
Test the fitting by opening and closing the valve several times. If needed re-loosen the four screws and Adjust the seal and retighten and repeat the test.
We suggest the Dry Link coupling is then pressure tested to make sure there is no leak
Please call 01235 512500 or email sales@actionsealtite.com for your replacement seal kit and for any queries you may have.